

Admin

2,440 posts
·
Joined 2024
They had it installed next to an existing shed, but that shed has since been moved and I closed off the other side of the fence continuing. I could’ve swore I remember seeing the line hook up so on the bigger side that has the more space with the fence on the left when you’re looking at the picture
465 posts
·
Joined 2021
Just finishing up this kitchen- we have a placeholder fixture over the sink since the one they want is backordered, and they haven't made a decision yet on the cabinet knobs in the library. But other than that, we had our final inspection today. The area of the sink run used to be a first floor bath, hall, and closet, and there was no way to get to that or the library without going "around" the inside of the house. So we removed all that and the dividing wall to enlarge the kitchen, and discovered that due to major settling that's since been addressed, the floor had sunk 2-1/2" in the 18 foot length of the kitchen. Luckily the high spot was at the door to the basement and we could level it without major engineering, but it did necessitate the mother of all thresholds at one of the two new doors to the library. We kept one set of library cabinets, and built two more sets to match. Flooring throughout was replaced with 2-1/4" white oak since the old thin strip flooring was shot... They reused the major appliances and saved a few bucks that way. Installed kick space heaters since there was no place to put a radiator, and they kept it toasty on the coldest days. Overall I'm pretty pleased, as are the homeowners.
![Image]()
![Image]()
![Image]()
![Image]()
![Image]()
3,297 posts
·
Joined 2010
Demo'ing a 12,000 sq ft house to build a new 12,000 sq ft house. I hope to start the new home late summer.
![Image]()
![Image]()
![Image]()

25,567 posts
·
Joined 2009
Reeded glass causing the distortion.
![Image]()
A linen cabinet.
![Image]()
The glass doors come from Element Design.
Tom
A linen cabinet.
The glass doors come from Element Design.
Tom
144,899 posts
·
Joined 2005
Finally got to the assembly stage of this kitchen.
Microwave Drawer
![Image]()
Drawers and pullouts
![Image]()
![Image]()
Trash and Recycle
![Image]()
![Image]()
Left of the stove drawer bank, right of the stove spice pullout
![Image]()
![Image]()
More to come when they get assembled.
Microwave Drawer
Drawers and pullouts
Trash and Recycle
Left of the stove drawer bank, right of the stove spice pullout
More to come when they get assembled.
144,899 posts
·
Joined 2005
Working today to get more cabs built and the finishing of a cabinet and the sides to the refrigerator cabinet done.
Drawer bank in the peninsula. End of run left of the dish washer. It'll have an applied panel on the left side.
![Image]()
Gotta put my mark on them
![Image]()
And the LeMans II corner cabinet. If I did these often enough they'd take about 15 minutes to install. But this is only the 2nd one I've done and the instructions are wordless and nearly useless. But after completing it I didn't even follow the instructions other than the left support that used a template to determine the centerline.
![Image]()
![Image]()
Drawer bank in the peninsula. End of run left of the dish washer. It'll have an applied panel on the left side.
Gotta put my mark on them
And the LeMans II corner cabinet. If I did these often enough they'd take about 15 minutes to install. But this is only the 2nd one I've done and the instructions are wordless and nearly useless. But after completing it I didn't even follow the instructions other than the left support that used a template to determine the centerline.
465 posts
·
Joined 2021
I’ve installed a couple of those magic corners- pretty slick if there isn’t room for a super Susan.
37,525 posts
·
Joined 2011
Interesting, but only thing that catches my eye is it eats up a lot of real estate...
These basically can fit around the same amount of clothes, take up almost zero footprint in a room and the distance between each garment is adjustable... allows for more free-flow of air (no must), and clothes don't have that foldover wrinkle from the rods... best of all, when your done, it retracts out of the way... you can do two levels of the same with twice the amount of clothes... you could also just have one panel that their attached to at the end of a pantry that can roll in and out like your unit, take up dramatically less space and provide twice the amount of clothes to be able to be air dried (don't get the cheap ones though... this one can hold up to 220lbs.)... they're sold in different finishes as well... other advantage is they're already on the hanger to put away, and in most cases, wrinkle-free because of gravity, removing a step from the process...
I came across it because we're getting ready to install it in a bathroom we're finishing that also has one of those closets for washer and dryer, and they needed a solution that could accommodate that setup...
25,567 posts
·
Joined 2009
Yes sir.
We have a 4 frame unit going on thge lower level. The installer has not set the cabinet yet.
Pretty nice system, only issue I see is the mounting channel is multi pieces and hard to keep aligned.
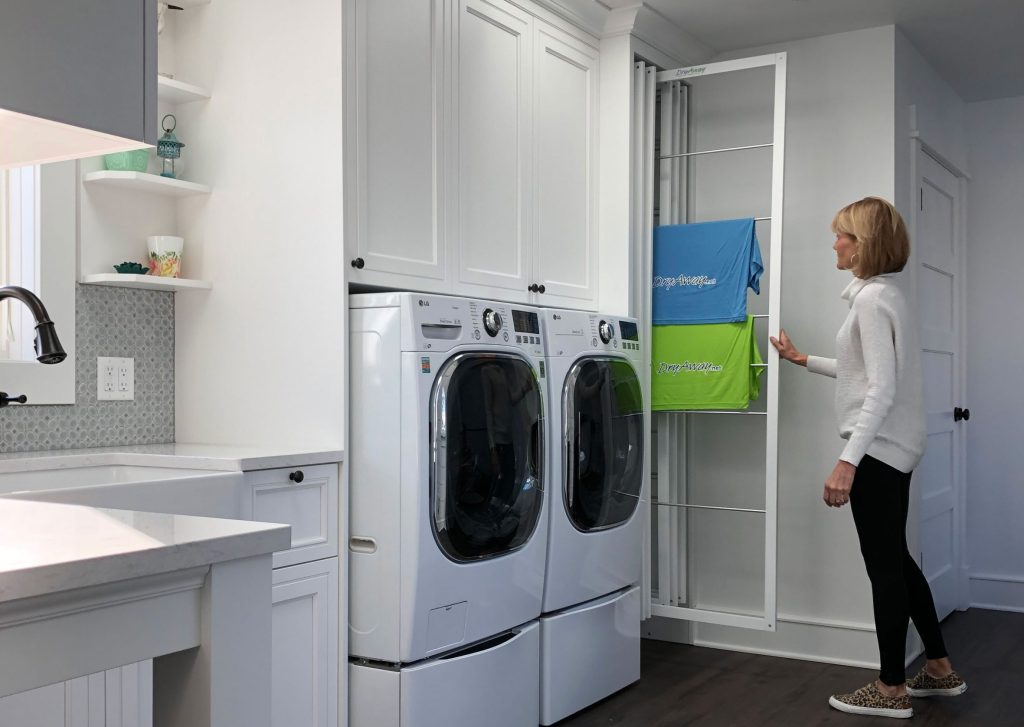
 dryaway.net
Tom
We have a 4 frame unit going on thge lower level. The installer has not set the cabinet yet.
Pretty nice system, only issue I see is the mounting channel is multi pieces and hard to keep aligned.
Dry Away Eco-Friendly Laundry Drying Racks for Your Laundry Room - DryAway
Introducing DryAway, the revolutionary way to dry your clothes! Out of sight and out of the way, DryAway’s patented design saves you money while protecting
dryaway.net
Tom
25,567 posts
·
Joined 2009
What you talking about, I heard Colorado has 300 sunshine days a year….
Dries via evaporation.
Tom
Dries via evaporation.
Tom
3,127 posts
·
Joined 2021
Got a link?Interesting, but only thing that catches my eye is it eats up a lot of real estate...
These basically can fit around the same amount of clothes, take up almost zero footprint in a room and the distance between each garment is adjustable... allows for more free-flow of air (no must), and clothes don't have that foldover wrinkle from the rods... best of all, when your done, it retracts out of the way... you can do two levels of the same with twice the amount of clothes... you could also just have one panel that their attached to at the end of a pantry that can roll in and out like your unit, take up dramatically less space and provide twice the amount of clothes to be able to be air dried (don't get the cheap ones though... this one can hold up to 220lbs.)... their sold in different finishes as well... other advantage is they're already on the hanger to put away, and in most cases, wrinkle-free because of gravity, removing a step from the process...
I came across it because we're getting ready to install it in a bathroom we're finishing that also has one of those closets for washer and dryer, and they needed a solution that could accommodate that setup...
View attachment 578249
37,525 posts
·
Joined 2011
They're sold other places but you can get also them on Amazon...Got a link?

Amazon.com: KATASKI Wall Mounted Drying Rack for Laundry Room Organization, Sturdy Foldable and Retractable Drying Rack for Kitchen and Balcony (Black Color 1 Pcs) : Home & Kitchen
Buy KATASKI Wall Mounted Drying Rack for Laundry Room Organization, Sturdy Foldable and Retractable Drying Rack for Kitchen and Balcony (Black Color 1 Pcs): Clothes Drying Racks - Amazon.com ✓ FREE DELIVERY possible on eligible purchases
www.amazon.com
13,728 posts
·
Joined 2017
One looks like it belongs in a trailer, the other looks like it belongs in a $2 million house.
25,567 posts
·
Joined 2009
We price them as base drawer cost plus $250.00. This covers the time to go measure for them and place them once ready.
Our drawers are hard maple, looking at the drawer you posted ~$450.00.
Tom
Our drawers are hard maple, looking at the drawer you posted ~$450.00.
Tom
144,899 posts
·
Joined 2005
Yep, I think I've been doing $250 for these forever and that's what I charged. But this one is 40" wide so it's huge. And like you said you need to install the cabinet and wait for the plumber to do his thing and then go back and measure.
144,899 posts
·
Joined 2005
I don't think I've made a solid wood drawer in forever. I use to make them out of poplar a long time ago and then a Maple plywood similar to Baltic birch but Maple. Then that got more expensive than solid so switched to Baltic Birch and haven't looked back.
37,525 posts
·
Joined 2011
Do you use pre-finished for the inside of the drawer and just finish the outside?
144,899 posts
·
Joined 2005
No, raw on both sides and I finish the entire drawer. The bottom only gets a seal coat and the inside and out gets 2 coats of conversion varnish. With pullouts I finish the bottom like the rest of the drawer - 2 coats.
37,525 posts
·
Joined 2011
I guess that's really the only advantage I see with ply (prefinished)... with the cost of ply today, adding the finishing, not much difference in savings from solid maple...
144,899 posts
·
Joined 2005
Process time. I pick up a 5x5 sheet of Baltic Birch and run it through the tablesaw to the various widths and then cut lengths and mill parts. I can have a kitchens worth of parts cut and milled in a couple hours. Plus one side prefinished means I have to mask it off.
With solid you have to plane, size, deal with defects, more sanding (no widebelt) the solid because the plywood is already sanded and all I'm doing is cleaning it up.
With solid you have to plane, size, deal with defects, more sanding (no widebelt) the solid because the plywood is already sanded and all I'm doing is cleaning it up.
25,567 posts
·
Joined 2009
Our supplier offers hard maple drawer box sides already planed and sanded to 5/8", we stock it in 4" 8" & 12".
Tom
Tom
144,899 posts
·
Joined 2005
That's nice for you. What are they charging per LF? Do they put the slot in for you or is it just S4S stock planed to 5/8". Those sizes wouldn't work for me very well. Everything on mine is a x.365" and I do 4.365 to 13.365 on the norm.
25,567 posts
·
Joined 2009
We groove it, just S4S.
We use even inches. The vast majority of our openings are X.625.
Our stanard base height is 34.75".
Tom
We use even inches. The vast majority of our openings are X.625.
Our stanard base height is 34.75".
Tom
144,899 posts
·
Joined 2005
My openings are x.25" and same cab height as you because stone is 3cm/ 1 3/16
3,297 posts
·
Joined 2010
Snapping off top 3' of 145 piers that are 12' deep, to prep for foundation for new home.
25,567 posts
·
Joined 2009
Are you reusing the piers or snapping them off to get them out of the way?
Tom
Tom
-
?
-
?
-
?
-
?
-
?
-
?
-
?
-
?
-
?
-
?
-
?
-
?
-
?
-
?
-
?
-
?
-
?
-
?
-
?
-
?
- posts
- 3.6M
- members
- 170K
- Since
- 2003
A forum community dedicated to professional construction and remodeling contractors. Come join the discussion about the industry, trades, safety, projects, finishing, tools, machinery, styles, scales, reviews, accessories, classifieds, and more!
Explore Our Forums


