Contractor Talk - Professional Construction and Remodeling Forum banner

Masonry Groined Vault II

23K views 31 replies 16 participants last post by  kcbabu  
#1 ·
I posted long ago about how to cut the groin bricks. I figured out something that worked. and it came out like this.


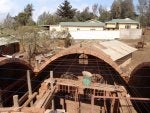
Then over this ground floor I wanted to make one groined vault 6m square, starting at same level as floor and rising steeply.

(first yes yes yes, i had the calculations for these thrusts done and ring beam designed.)

I couldn't sleep for 6 months trying to figure out how to cut the groin pieces as it is so steep and hence different. Also I planned on running arches parallel to wall and not perpendicular.

So thought you might like to follow me along.

We started and just couldnt figure it out.


then we tried cutting both (below bottom) but had a joint in the groin. It would work but....


then on the upper part we figured out how to cut one cornor off and overlap. We still have a void but we will either fill with mortar or cut a piece.

So we tore that down and started with that layout.
I guess i can only put 5 pics to a post.
 
#2 ·
And so the groin looks like this. I thought i would have to start going vertical very soon to hold the bricks there but was able to go up about 5 feet laying horizontal. Once some fell. There is NO centering. I am using clay mortar and after 5 secs it will hold the brick. Gypsum would do the same. the mortar has no load bearing work, nor does it add any strength.


Then so you can see the vault coming along. I finally got the scaffolding so i didnt have to stack up bricks! You can see the strings if you look carefully


From the outside. I cant sleep anymore I am so psyched.


This one is wild. Lying on my back looking up the groin. It appears to be straight and the arches appear curved.
 
#10 ·
Thanks much CJKarl. Just to have you comment is an honor.

At some point it would be interesting to pursue with people like you and this forum why it is not used since about 1930's in the USA. I doubt it is purely that reinforced concrete and steel became cheap and labor more expensive. Or is it? Some people have alot of money.

Your masonry skill far exceed ours, ours is more of an engineering coolness. To look at some of your rock work is inspiring. So I will continue on these but work more on aesthetics too, straighter cuts, lines, uniformity.

Good masonry like yours is not cheap, so why do people pay for your great work but not ask for brick roofs? I mean no offense to you, if I had the money I would hire you also.

Someday i will throw some numbers down on what it costs, although our labor costs are much cheaper for comparison, and our wood costs higher.
 
#11 · (Edited)

Above gives better idea about how we cut a triangle off top of brick that goes into the groin. Today looked for awhile and think even the low angle groined vaults should be done this way. I think Denver2 was telling me that a year ago but I couldn't see it.


Well i did live through the 60's as a kid so I think i am allowed to put a wine bottle in the roof. And I probably can only get ex hippies to rent it anyway.


Above , probably stupid idea, but I put in some bricks sticking out for a permanent ladder. I have to cut them off as they stick out too much and will cause too much force. Also to waterproof that and then step on it will be an issue. Whaddaya think?


Here you can see more of the built in ladder. But I posted to show how i managed a 50cm (18in) overhang on the ground floor. It also serves as access around the first floor windows and water catchment pipes. There is no steel except the ring beam. The wall weight counter balances the overhang, so force goes back to the wall.


To get an eave on this part of the house I started moving some bricks out at end of walls and at cross lintels up to the lintel, and then tied these extensions into the lintel. Lintels are inside brick cavity, this cavity is made with 1/5 and smaller bricks. Really time consuming but looks better. Then on the lintel sticking our we made a plain arch. these are only about 30 cm.


This was about a week ago, seen over the brick drying sheds.
 
#16 ·
In looking at the pictures for the 20th time I guess I'm wondering how watertight this will be when all said and done.

Whats the weather like in tanzania? It seems like this building would be a nightmare to cool or heat.

Having said that it is still way way way amazing. The kind of thing I want to tinker and do when I retire in 20+ years.
 
#19 ·
In looking at the pictures for the 20th time I guess I'm wondering how watertight this will be when all said and done.

Whats the weather like in tanzania? It seems like this building would be a nightmare to cool or heat.
When I get there it can be a different thread about waterproofing. I have been fretting about that also.


I have 2 domed rooms and a small vault. they all have 1-2 inches of cement plaster, one with waterproof cement mixed in. All have either weld mesh or chicken wire in the plaster. the vault one has some seepage and used floor wax and it sealed up. So I know it can be done but would like to try different this time.

I will place roofing felt (tar paper) first. Then i might try different coverings:
-cement plaster
-clay and sand
-lime and clay and sand
-lime plaster

weather is temperate here 55-90. two rainy seasons one two months long and can heavy heavy rains up to 4 inches in 24 hours.

In another small house i made they say it stays nice and cool but after midnight it warms up. So if i could figure out how to time it so it heats up the room slightly after 2am it would be great, that is when our houses get slightly cool.

I think the house is going to be too cold in the cold season when it is about 55 outside and little sun.

Next house I work more on the passive solar heating and cooling.
 
#21 · (Edited)
It is slow going. You can only do 1-2 arches on a side, the groin cuts are odd, and all the strings get in your way. Dickson says " lets go slow and get it right." when i get impatient.

Today I climbed up on top for some pics.


Putting in a stone chip in the extrados.


Close up of the groin cut as it gets steeper. It seems to defy gravity. The bricks are mine and look like crap becuase of the ash. They have never been wet, so that will wash off and look like the walls.


I wish i could put clear waterproofing over the top. A shame to loose the brick look on the roof.

I deleted this similar pic before but it shows up as "attachment"
 

Attachments

#24 ·
Great workmanship Fundi. I've never attempted an arch without using a centre. Not a corrugated tie in sight:laughing:
With regards to the waterproofing, tha problem with a sand/cement render is that fine cracks will usually develop and allow moisture in.
On the old Regency townhouses round here, the basements had arched cellars under the pavements (sidewalks) for coal deliveries.
They used hot pitch to waterproof them.
You could always use mastic asphalt, and then brick over the top again to retain the looks:laughing:
 
#25 ·
Fundi, this looks awesome. Two things come to mind:

-I would not have thought this would work as you are doing it without seeing your pictures. According to the historians, centering was used for groin vaults at least at the groin itself. Obviously the historians may have been wrong. With that said, be careful up there. It would be terrible to have something go wrong with so much weight in the air.

-The difficulty with the groin joint is exactly why ribbed vaults were developed. It's really just a means to hide that joint. It would be easy for you to build ribs with light centering or just add them after the fact.

-With the Gustavino or Catalan style vaulting, I'm pretty sure they never built groin vaults, but that can be another topic entirely.