Contractor Talk - Professional Construction and Remodeling Forum banner

What tile project are you working on?

620K views 4.1K replies 216 participants last post by  TileMarbleGranite  
#1 ·
It's been a little dead hereabouts lately, so I thought I would try and liven things up a little.

Post some pics of your current tile projects in progress. The good, the bad, and the ugly.
 

Attachments

#3,875 ·
I know a ton of respected installers (even on here) that don't follow the manufacturers instructions to the letter. As long as you will warranty your work, what else matters?
 
#3,879 ·
That's why I used the modified thinset the booklet stuffed inside the package called for all these years. When a real person who I respect told me that there was a change, I figured he must have a good reason.

I can't reference any codes or docs, but I feel like this might circle back nicely into the straight comb/circle comb debate.
 
#3,885 ·
Ok the Install was straightforward
.

1 Waterproofed with Tec HydraFlex.
2 I left a space for the deco strip in my set. The three rows plus grout joints.
3 Ordered Laticrete Plasma Translucent urethane grout. This was like questing for the holy Grail ----- 5 weeks on order before I get my hands on a pail
4 bore a hole through the backer (you need to have the back side open so there will be Drywall repair.
run the led strips through the hole and fil with Sika Flex. (order enough for complete coverage I had 18' of run and ordered 2-12' Outdoor rated strips)
5 backfill the strips with the Plasma to make it flush let dry (next day)
6 second coat the inset area again 1-2 mosaic strips length at a time, Back fill the glass mosaic. press in with the edge of a margin trowel flushing the deco to the field and squeezing out the excess, use a grout float to fill any voids and rinse.
7 repeat till finished.

NOTES: Use only glass that is colored internally (a lot of mosaic has the color painted on the back of the tiles this will not work)

This method could be used in a backsplash set it up sothe transformer is in the above the Microwave cabinet.

After doing this once I would recomend 2 led strips for every3-3 1/2" width of deco strip.

Make sure you order the proper color of led (there are several hue's of white that are sold.

I am not sure if the colored led strips will work well as the individual leds are spaces a ways apart.

That 18' x3 1/4" strip took a full 1 gal pail. Order heavy for the first one and have xtra.
I have a few pics but they are not too useful.
 
#3,887 ·
Why have I waited so long to try QuartzLock?! Listened to all the tips from guys here and my first use was very successful. I like it! Way less mess than with epoxy and I didn't feel stressed to hurry up because the time was ticking. I just worked small sections at a time and cleaned up as I went.
 

Attachments

#3,895 ·
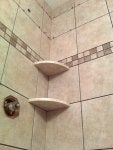
The ammonia in the Windex is what cleans up the haze. I've used 409 before, worked great. But that was when I first started using it.

I have posted my process before and I it has always yielded me with zero haze issues.

You need to keep the buckets of water clean. I use a three bucket system.

1) Get the tile damp but not wet

2) I use my hand palming the grout into the joint. This eliminates much of what is dragged across the tile leaving the majority of the haze.

3) Then use a white scrubby or scrubby sponge. I like the white scubbies that are typically used in epoxy installations. These sponges lift a good majority of the grout off of the tile.

4) Then I use a standard sponge in separate bucket. I wipe it on one side, overlap by half and use the other side of the sponge to wipe. It's rinsed and repeat. That bucket is changed about every 20 wipes.

5) The next pass is with a microfiber clothe (or sponge). I fold the clothe twice to give me 8 separate sides to use. I will wipe it down with one side, flip, wipe, unfold wipe, flip wipe until I have used the entire clothe. It's rinsed and I wipe again. This bucket is changed every 10 or so clothes

6) I now use a dry microfiber to dry the tile and pick up any stragglers. This clothe will eventually get wet enough to be useless as a drying clothe, so it goes into the wet bucket after 20 or so wipes.

The buckets are rotated. So the microfiber bucket becomes the sponge bucket and the sponge bucket becomes the scrubby bucket.

It's a lot of work, but it works. I usually have two or three guys working with us when we are installing. One guy's sole job is to switch out the buckets.

Hopefully that helps.

Rob
 
#3,896 ·
I tried the different recommended techniques and methods for cleaning on this tile. Wet tile before, microfiber towels, doodlebugs, blaze, windex... This was the best I could get it and I was only doing tests about 3" x 3", so there's no way it set up too long before cleaning. Had to use spectralock, no problems, but I hate using epoxy.

 
#3,898 ·
I tried the different recommended techniques and methods for cleaning on this tile. Wet tile before, microfiber towels, doodlebugs, blaze, windex... This was the best I could get it and I was only doing tests about 3" x 3", so there's no way it set up too long before cleaning. Had to use spectralock, no problems, but I hate using epoxy.

View attachment 295273
Looks like some of those tiles were matte with no real sealer. I would seal them with a matte sealer first. The urethane is absorbing into the tile.
 
#3,900 ·
Well maybe I got lucky on my first one. Just a slight haze on some tiles. Sprayed on Windex, slight scrub with a white scrubbing pad, then a wipe down with a microfiber cloth.

I really like that I had a half hour before I had an appt and could grout a little bit and close up the lid. After my appt I will finish it up.
 
#3,906 ·
How did the windex trick work. ive been using the mapei flexcolor cq. God all mighty. I must of changed water pails 5 times on a 6x6 floor with 12x24 that I used warm grey grout on. wiped it 4 times and a final with a damp micro fiber cloth. Came back the next day and you can see the risidue on the tiles in places.
 
#3,904 · (Edited)
I tried something new with the first row. Since this is a linear drain at the back wall, the sides taper. I did the back wall full height and tapered back from there. I cut the tiles and hot glued them to a piece of 1/4" luan. Drew the straight line for the taper and cut them all at once on my little table top saw. Popped them off and installed them. Worked pretty well.
 

Attachments