Contractor Talk - Professional Construction and Remodeling Forum banner

my first fireplace surround/ manlte

8.6K views 28 replies 13 participants last post by  chris klee  
#1 · (Edited)
i picked up a real nice job today. a 13' built-in with a desk, the fireplace surround, and crown in the whole room.

the home owner had a magazine pic of what they wanted it to roughly look like. all paint grade. she wanted dentil, that was all she was concerned with.
the fireplace is a sealed gas unit, zero clearance.

Image
 
#5 ·
Ok, as you are asking. My opinion is just that, and since the drawing doesn't show the fireplace in context with the room - ceiling height, wall space, windows near by, other architectural details - this is what I think :whistling subject to not knowing what I'm talking about :laughing:.

I like to see a flat detail around the heat source - could be 4"-6" wide of flat. Could be wood boards or tile or even a series of wood square tiles, but all kept within 1" of the face of the zero clearance heat source. Then I would scale down the width of the columns. With the flat that I described the column heights get taller and more slender and so the header gets scaled down too. The mantel gets set up a little higher and in this case I think it could have more mass. I admit that I would be more inclined to have the columns carry the mantel terminating in a cap detail with a header panel set between, BUT I like your basic idea as drawn - just go narrower.
 
#7 ·
its on a 45* wall thats not much wider than the mantle width and the ceiling is 8'11"
i am going to have to measure the 45* wall again to make sure i got the right dimensions, my notes were kind of sloppy.

i will play with narrowing it up a bit this weekend and see what it looks like.

thanks
 
#11 ·
At least draw in the fire box.

When you introduce that rectangle into the mix, the size and height of it will have a huge effect on the proportions of the mantel.

Or go with what you got, it will probably look fine. But we can't be sure.
 
#13 · (Edited)
without a flat area off the firebox you are going to dwarf the fireplace. Especially on a 13 foot wall. I would seriously run this by the ho. It could bite you in the end. just looking out for you.

here is a pic of what im talking about. Built this a while back. Very minimal flat on the sides of the fireplace. Now imagine bringing the top down to match the side reveals. Would look like poooo

Image
 
#14 ·
the firebox is the opening i have drawn.
the fireplace isnt on the 13' wall, the wall is only a little bigger than the mantle.
i have a built in desk along a 13' wall.
the pic you put up is almost exactly what is happening, just not as far out from the wall.
i am going to work on tuning up the drawing a bit with the sugestions i have so far.
thanks all
 
#16 ·
Chris,

Here are a couple of places with great information on them. The first has pretty good illustrations of the Classical Orders and some basic terminology, but not much in the way of detail. Nonetheless, I think it would be worth a look at for every trim carpenter. Nearly everything we do is/should be, derrived from those orders.

http://www.cmhpf.org/kids/dictionary/ClassicalOrders.html

The narrative slide show below I think is the single most important video/article/description /exhortation ever done for trim carpenters, and it was done by a trim carpenter besides. What's more, it is there for the viewing and is free.

It was done by Gary Katz, who at some point in his long career as a trim carpenter, began to question why some jobs looked great and others just didn't look right. But unlike some of us (me, for instance) it didn’t take him 25 years of building things before he stumbled into jobs for a great European classical architect who designed huge homes in the classical style, to begin to put all the parts together. Instead, Gary began to notice, then study, older homes and periods in architecture. He cut out years of blundering around before finally stumbling into what has been known for thousands of years, simply with a little studying.

No matter how good one's technical skills are, the end result is only as good as the overall design, proportions and choice of details.

He goes over a lot of very valuable information for those who wind up doing design work for homeowners, and his examples crown molding types is nothing short of essential information.

On large fancy jobs, being able to talk to architects in their own language can have benefits as well. Before long, you’ll find them asking your opinion on how this or that detail looks. Eventually, they may allow you to substitute crown moldings – a huge asset if the one they have spec’d on the detail sheet is not copable. A number of times I have had knives re-ground from an uncopable detail to a copable one.

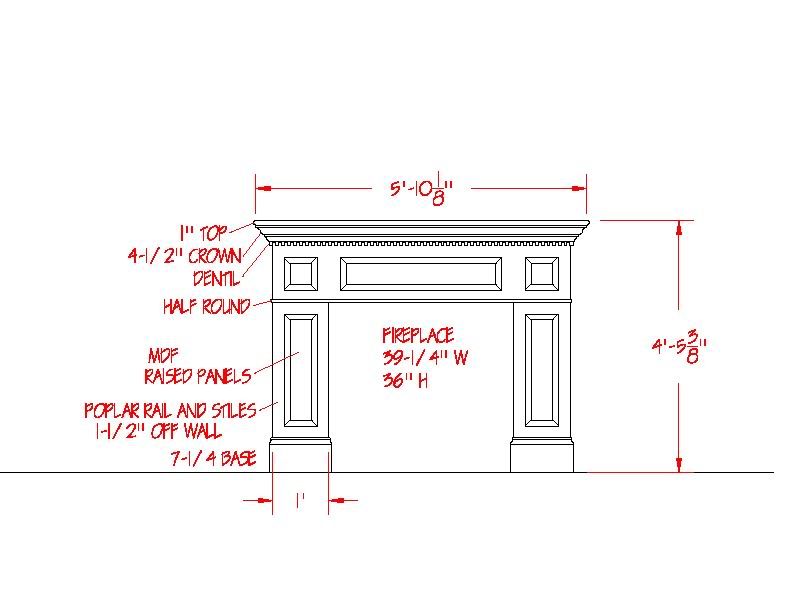
If you pay attention to some of the fireplace surrounds in the video (and what Gary is saying about them), you will probably be able to label the style that RS (and I) both personally like. He does make a couple mistakes (from old habit) when talking about casing heads (or entablatures) by calling them pediments right after telling us that they are NOT pediments – for which he took a bunch of guff. Just goes to show how deep mistaken terminology can sink into our brains.

http://www.garymkatz.com/JLC/Presentation-08/CommonTerms-6/CommonTerms-6_controller.swf

Cheers,
Jim
 
#19 ·
I made the mantle/ surround.
It's getting painted after its set. I might redo the top cause i think its too narrow but others wise I am pretty happy with it. I did take the suggestions from here and ran a little flat wood about 2" wide around the fireplace.
 

Attachments

#29 · (Edited)
I put the pics in show us your work thread in general, but here is the finished product

Btw: who ever said to put the flat stock between the raised panel legs and the fp, as you can see I did that and the ho's both commented how nice of a detail that was.
So thanks to everyone who steered me in the right direction. I even got a nice thank you email saying how great everything was and what a pleasure my self and the paint crew were to work with.
 

Attachments