Contractor Talk - Professional Construction and Remodeling Forum banner

Jack Miter Jig

1 reading
26K views 35 replies 12 participants last post by  ApgarNJ  
#1 ·
I made a jig to make cutting jack miters easy. Jack miter cuts can be done with power tools... but the head casing miter cut made with a power miter saw leaves a fair bit of hand saw work to get into the inside corner (like finishing stair stringer cuts by hand).

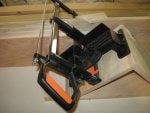
The jig I made holds the casing on edge with just the profiled portion to be mitered showing. This is similar to the jigs the old timers used to cut jack miters... I just added the hand miter box. This lets you cut the miter with a hand saw very precisely and quicker than cutting with a power miter saw and switching to a hand saw to finish. This only makes sense it you regularly cut jack miters (of course if you have one you might regularly cut jack miters :eek:) )... but here it is anywho:
 

Attachments

#12 ·
A jack miter is a combination of a butt joint (of the flat portion of a molding) and a miter (of the profiled portion of a molding). It is used to avoid very large miters which tend to open up with seasonal changes. In this day of conditioned spaces it is less important, however it is still a good idea in my area (Minnesota) due to radical differences between summer and winter.

In the age of hand saws jack miters were rather easy to do... with power tools, not so much. Now they are considered difficult to do well, and time consuming. My jig is a way to make them easy to do.
 
#14 ·
Neo,

That is a Jorgensen. The saw is decent, but small. Pretty short stroke... not a real pro miter box. It is good for cutting base shoe though.:party:

The small size makes it good for this jig... small 45* ramp, and attaching it to the big slot miter box jig makes it nice and stable. I like doing hand saw work, makes me feel connected to craftsmen of the past.:biggrin:
 
#16 ·
Very nice bit of info :thumbup:

I would have cut the mitre with my chop saw set to a 45 bevel, then the straight cut on the table saw. I wouldn't have even thought to have a jig like this. I'm sure this produces much better results. I may need to talk my boss into letting me put one together at the shop :thumbup:
 
#17 ·
Got rained out last week (jobsite shop in the yard) so I took the measurements to the shop and precut as much as I could. Each doorway has 15 pieces of trim and 24 cuts (compared to 3 pieces of trim and 4 cuts for a basic door casing set):
 

Attachments

#18 ·
Two of the doorways met at an inside corner and the casings had to be ripped down. One of the doorways was not plumb so the rip was tapered... and the heights were 3/4" different. I cheated the head reveal up on the low door (to the garage) and made up the rest on the flat of the casing.

Even with the trim mostly precut, I only managed to trim 4 doorways in a day.
 

Attachments

#31 ·
very cool, more recently i have started doing jack mitres, not so much for this type of profile but for windows and doors that are side by side where the full width casing wont fit so i have to rip the intermediate piece down to work.

on my next day making jigs i may have to make this guy up
 
#35 ·
Hey Dan,

The larger (wider) casings do tend to open at the inside corners, like you have suggested. Jack miters or butt joints are the best options. If you have to miter large casing the MiterTite system I reviewed is a good way to go (it is from the same company as the Collins Clamps so you may have seen it on their website):

http://www.contractortalk.com/f13/mitertite-casing-assembly-system-review-68476/

Cheers,

Bass
 
#36 ·
Yeah, I did see that but I don't run into super wide mitered casings much anymore. Only some customers are actually willing to pay to do all the work requiring the mitertite system. I don't like that you have to plug where the screw goes. I was thinking they should have it so the screw goes at the top of the casing and you might not see it, maybe you can do that but I couldn't tell by the video.
I normally glue up, can clamp on a flat table the two legs and top casing and then tack the corners with 18 ga. 1" nails. problem with that is waiting for the glue to setup.
most of the colonial trims are just nailed up, glued , once piece at a time.