Contractor Talk - Professional Construction and Remodeling Forum banner
1 - 13 of 13 Posts

CGofMP

· Registered
Joined
·
366 Posts
Discussion starter · #1 · (Edited)
Greetings,

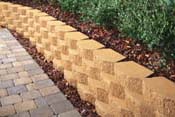
Am putting in a nearly knee high retaining wall. Am going to be using the lipped 'interlocking' flat faced manufactured stones that Home Depot offers. (each is 25 pounds) I intend to run 4 courses along the 50 feet of wall. One course will be burried. Below the burried course will be some sort of rock fill in the trench.

Image
Image


I want to make sure that this wall never sags or moves if at all possible.

Problem is I dunno what sort of rock/base would be best for this application.
I have called local rockeries and have been given suggestions that are across the board from Sand to roadbed rock (which I gather is a mixture of 3/4 inch rock on down to sand)

I'd really appreciate any informed advice on what sort of rock to use and or any other advice on this sort of project.

Thanks!
Charles
 
Hi Charles,

My preference for this sort of footing always was a stabilized sand mix.
That would be a real lean (5-6 parts sand to 1 part portland cement) mixed with enough water to just set off the reaction, ( Crumbly- not squishy) and compacted into your footing trench.
Only disclaimer is that all of my work is in an area where freeze-thaw and frost heave are not an issue.

JVC
 
go to the website of the particular brand of cmu you are using. Almost all of them give the specs for the footing.

JVC's idea about the stabilized sand is brilliant and I have used it lots of times thanks to him...but not sure it would be the best in this situation. Most of the systems i've put in call for a #5 rock compacted it is a rock about 3/4 of and " in diameter.

I guess my only real advice assuming the wall is short is to get the first row dead on...meaning straight. If you do that all the others go up easily and the final product looks great. Goof up on the first row/footer and then you get a wavy wall that cant be straightened. If it is laid in straight line pull a string.

Tim
 
Ideally, road base rock. Basically 3/4" stone mixed in with smaller and smaller stones down to fines, but no sand. 3/4 minus, grade 8, CA6, crusher run, pack rock...lots of different names for it depending on region, just ask for the stuff that they put under asphalt.

Make sure you compact it well, wet it down if it is too dry, and try to have a homogenous mixture of stones and fines. Like lukachuki said, take your time on the first course (4+foot level is recommended). Coarse sand can be used the last 1 inch (no more) to make your leveling go easier. Let me know if you need help with anything else. Good Luck.
 
CGofMP said:
I want to make sure that this wall never sags or moves if at all possible.I'd really appreciate any informed advice on what sort of rock to use and or any other advice on this sort of project.
I've had the opportunity to build a considerable amount of interlocking CMU wall (including several at my home, up to 10 courses high, built with Home Depot products) in the Mid-Atlantic region and they've all remained stable. Here's some informed information:
1. Your local soil conditions play a considerable role in determining what best to use as both a base and a bckfill material. A well draining soil doesn't demand use of a granular base material or backfill (read 'crushed stone or gravel') material. In a typical application, gravel is used to accomplish soil drainage, not to 'bridge' unstable soils. I've used #7 stone with great success (it's easy to level and compact and it drains well).
2. All the stone in the world won't prevent freeze and thaw effects on soil above the frost line. Toeing in the first course below grade only serves to prevent soil erosion beneath the bottom course.
3. The key to minimimizing freeze thaw effect lays in relieving water from the surrounding soil. That's where the use of both a granular base and backfill material becomes critical when building in poorly draining soils. Even when using granular material, if water isn't relieved from the lowest point at which it can collect, it remains a potential problem. Water standing beneath a wall saturates the underlying soil, over time weakening it and subjecting it to freeze / thaw action. Saturated soil behind a wall can impose excess lateral loads (weight) in addition to being subject to to freeze / thaw action.
4. Poorly draining soil tends to migrate (get pushed along) with water flow. In the case where crushed stone backfill is used behind a wall, soil migration can 'choke-off' the stone over time greatly reducing or otherwise eliminating it's ability to relieve accumulated water. In a case where only soil backfill is used, soil can migrate through gaps between CMU units causing unsightly stains and settlement behind the wall. To prevent soil migration install a continuous layer of non-woven geotextile (filter cloth) between the soil and the wall or between the soil and the crushed stone backfill.
5. No matter what you use as base and backfill material, adequate compaction is critical. Avoid both over excavation of the footing (and subsequent re-fill with uncompacted dirt) as well as placement of poorly compacted backfill (subject to substantial absorption of water)

To summarize:
1. Compact soils both beneath and behind the wall.
2. In poorly draining soils, use gravel backfill both beneath and behind the wall. Size #7 is easy to work with and has a sufficiently 'open' gradation.
3. Provide relief of accumulated water 'to daylight' from the lowest point at which it's subject to collecting (bottom of gravel / top of dirt) by means of a perforated pipe embedded within some segment of the gravel.
4. Use filter cloth to keep backfill soils from migrating.
 
Discussion starter · #7 ·
Freebase rock ...
Bob.... We need a b:shutup:tchslap smiley for you! :thumbup:

To the rest of you guys I really want to say thanks for all the advice and help on this project. This was EXACTLY the kind of help I was looking for and I do appreciate it.

JVC and Lukachuki - Freeze/thaw is not an issue. the ground never freezes here and if it does it wouldnt be more than 1/2 an inch. So thanks for that. Copy that on making the first row level and straight. Even while digging the trench I'm already being a bit anal bout that.

JVC's idea about the stabilized sand is brilliant and I have used it lots of times thanks to him...but not sure it would be the best in this situation
Is this because of my obvious neophyte / non-masonism :) ? Or is there another issue?

orionkf - You are the second to suggest road base. Thank you sir. I have a 4 foot level and will make good use of it. Thanks for the offer for further help.

Pipeguy - Wow. Thanks for the thoughtful and detailed writeup. REALLY appreciate it.

Your local soil conditions play a considerable role in determining what best to use as both a base and a bckfill material. A well draining soil doesn't demand use of a granular base material or backfill (read 'crushed stone or gravel') material.
Drainage is a big bad issue. The soil was once farmland - mostly cotton near as I can figure. It is a mix of loam and adobe clay and it drains pretty darn slowly. When it does get saturated it becomes very squishy. So I guess I will need granular. The question then becomes how much and how deep and what kind.

I have been figuring on a blocks depth of fill then a course of block burried in fill..... then the real thing at lawn level. (3 courses of that) so 4 all together.

Toeing in the first course below grade only serves to prevent soil erosion beneath the bottom course.
I was thinking that was to help stabilize the wall from lateral pressures...

That's where the use of both a granular base and backfill material becomes critical when building in poorly draining soils. .... Saturated soil behind a wall can impose excess lateral loads (weight) in addition to being subject to to freeze / thaw action
.

Getting rid of the water behind wall won't be a problem... I plan on hitting that with pea gravel maybe 4 inches or more back? I can easily put in a drain tube back there as well. at ground level. The runoff basin for the lawn is right next to the wall so I can drop the water from behind into that.

BELOW the wall will be an issue that I do not readily know how to solve. The first course of the wall that is not burried will be at the level of the runoff basin so basically in digging a trench to fill I am making a slow draining bowl. :furious:

soil can migrate through gaps between CMU units causing unsightly stains and settlement behind the wall. To prevent soil migration install a continuous layer of non-woven geotextile (filter cloth)
Already have that bought. figured anything gravel would have this wrapped around it front and back.

Again, I really appreciate the insight and help. This is exactly what I needed and is far better than I could have gotten from DIY forums or the droids that work where I am buying the supplies.
 
CGofMP said:
...Drainage is a big bad issue. The soil was once farmland - mostly cotton near as I can figure. It is a mix of loam and adobe clay and it drains pretty darn slowly. When it does get saturated it becomes very squishy. So I guess I will need granular. The question then becomes how much and how deep and what kind.
I'd center the block in a trench twice the width (depth?) of the block and make the stone 6" deep or otherwise remove/replace whatever topsoil you might have (whichever is greater). All the suggestions for material type are good ones - take your pick.
CGofMP said:
BELOW the wall will be an issue that I do not readily know how to solve. The first course of the wall that is not burried will be at the level of the runoff
You can only do what you can do - don't sweat it. If you want a little additional stabilization of the foundation, cover the footing trench with the bottom edge of the filter cloth before you place the stone bedding. Have fun:thumbup:
 
I would not recommend using stabilized soil under pavers or segmental retaining walls. The design of the product is such that movement is allowable, and none of the manufacturers will suggest the use of anything other than compacted road base/sharp gravel.

Gravel behind the wall is best with perforated pipe at the base.

You can have the pipe drain through the face of the wall or bury and extend the pipe out to a lower point in the yard.
 

Attachments

Discussion starter · #10 ·
Again, thanks to all for your help.

Sometimes I detest small town living.

My choices at the locak rockery were as follows:

60/40 sixty percent sand and lots of rounded rocks looked up to an inch.

Pea gravel

"Decomposed granite" - looks like sharp sand but a bit larger grained.

Crushed granite looks like its about 3/4 inch on average

Cobble stones and ornamental rocks.

Thats ALL they have there.

GROAN. I do not think any of that will work from the posts above. I am sad to say I have no pickup truck so picking this stuff up myself is gonna be problematic and having them truck it in from an hour or so away is gonna get pricey.

I expected to have the base in today... Im dissapointed.
 
Crushed granite will work fine. Shovel it in and run a plate compactor over it, and then use the decomposed granite to level your your first course of block. Be sure and knock the rear lip off the base course and figure 15 minutes per block to get them set correctly (level front to back and side to side as well as in alignment and on grade. Use the back side of the block for alignment, BTW, as the split face has a 3/4" +/- variance.)

edit-If you don't want to use a plate compactor, shovel in layers of 2-3" and use a hand tamper.
 
Discussion starter · #12 · (Edited)
Okay Im gonna sound like a boob here but wouldnt the decomposed granite eventually filter down and through the crushed granite? I would think putting any sort of "sand" on top of a 3/4 inch crushed rock base would eventually percolate itself down through the crushed.

Yea I know I'm showing my ignorance here.

As for the leveling, I'll take as long as it takes. 10-15 min sounds about right actually as today I grabbed 20 bucks worth of flagstone and a bag of sand and put that in on the other side of the house. Took about that to get it angled the way I wanted it.

Using a hand tamper is the way I'll be going on this. Will fill the excavation icrementally as you suggest. Had that kinda in mind already.

Another dumb question, why am I knocking the lip off the burried first course? I have seen it reccomended to either do that or to turn the first course of blocks upside down. Is it just for ease of leveling? I dont mind a little extra work in that department to add to the grip at the base WITH the lip not removed. I have also speculated it is so the first 2 courses can be lined up exactly even with each other so as to give more gravity hold. Am I anywhere close on that?

Copy you on using the back face of the blocks for lining them up. Planned on that already. Even though flat faced on the front I noticed the tendency for the "natural texturing" to make that to varried to be accurate for layout.
 
The compacted base should be within 3/8 or a half inch of "right" (less is better), and if the available crushed granite does not contain fines, you should add enough of the decomposed as you compact to make it more or less a solid mass. Knocking the rear lip off just makes the bottom of the block level, and you do not want to remove any but the bottom course's lip as that lip is what secures the wall. If you have the base compacted and leveled well, it would be hard to get the base course right with the lip on the block.

The lip serves 2 purposes: It locks the blocks in place and it ensures the correct batter to the wall.
 
1 - 13 of 13 Posts