Contractor Talk - Professional Construction and Remodeling Forum banner
1 - 20 of 94 Posts

jjbeano11

· Registered
Joined
·
8 Posts
Discussion starter · #1 ·
Hey guys,
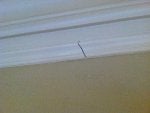
I did a crown molding job a while ago. Out of everything I do, I do this the least. I installed crown in a house without knowing some of the tricks. Gaps developed, they called us back, I THOUGHT I researched the heck out of how to properly install. I went back and reinstalled EVERYTHING again. It's about a 5 inch tall MDF crown, and then there is a little decorative real wood strip about 4 inches under it for an accent. I bought all sticks, took them to the house, let them acclimate for about a week. I did those angled cuts (forgot the name) because I know EVENTUALLY it will still seperate a little. I made sure to shoot the nails into studs. I even placed wood behind the seems where they wouldn't land directly on a stud. I covered the seems this time with wood filler. I used 20 minute mud over top because she was SOOO picky that she didn't want to see the seems at all. It was sanded, primed, painted. You couldn't see anything. Now, not even 2 weeks later, she has sent us pictures showing the gaps again. PLEASE tell me what I am doing wrong and what I need to do to rectify this.

Also, please be specific about products to use and names and locations of where to get them. I live in California.

Thanks SO much for the help in advance. I want to get done with this and I want her to be happy, so any assistance is greatly appreciated.

Thank you!
 

Attachments

20 minute mud?????????? Who told you to do that? Vinyl spackling, maybe, but 20 minute mud?

One thing I am seeing (I think) is a pretty shallow angle cut. Some guys use 30 degrees, but I always use 45 degrees, and I also nail directly through the cut, itself... as well as to either side of the joint.
 
  • Like
Reactions: greg24k
All scarf joints should be installed with wood glue. I didn't see it mentioned in your post.

If the scarf is glued and fastened properly, any movement should be limited to the corners, where it will be less apparent. In a perfect scenario, the long runs should extend to the corners and short runs coped into them, hopefully in one piece, cut a bit long and snapped into place by bowing out the center to get the copes into position.
 
Just fill that with some latex caulk. You can't paint over silicone.

You may need to do two applications, as it will shrink a little. I never use wood filler either. You need something that will expand and contract a little.

When I do crown I glue those joints, then fill any minor gaps with caulk.

Just fill it and wipe off the excess with a damp cloth.
 
If I go back and pour wood glue in those joints, will that alleviate the problem? Glue, paint over top?
Glue will dry hard. You want something a little flexable. Like I said, latex caulk. Apply first filling, go back the next day and check. If it needs more then fill again. Remember to wipe off the excess.

Then go back and prime and paint. Explain to the customer that it's a shrinkage problem that varies depending on the humidity in a home. Each home is different.

It's not poor workmanship. I was in a home once and the humidity reading was like 87%. I told them "do you know 100% is rainfall" :laughing:
 
If a joint is fitted and glued properly, it should only require light sanding before priming and paint. You should NEVER have to use caulk to "hide" a joint. It won't be all that invisible.

I'm not sure that there is any great solution to what you have there now.

Anything that hardens will be brittle and will surely open up again with changes in humidity, etc.

Caulk may be the only viable solution at this point, but caulk generally needs to be of substantial thickness to have enough mass to stretch as the gap opens.
 
I glue just like what's been said before. After seeing TBF's method for quarter round, I've tried it a few times as well. So far I'm liking it, and have no complaints.

I also stick all my material with the moisture meter. I know it's at whatever % moisture before I start, not based on time. Where are you getting this material from? box store that just brought it in from outside, or a wood supplier? This can make a HUGE difference in acclimation times.
 
Get some color matched Mohawk fill sticks and be done in about 3 seconds.

Next time don't use hot mud. That will be brittle and crack (obviously in hindsight you see that now)

And use glue on the joint

Are they using a wood stove in the room or close by? That will do it every time.
 
...I did a crown molding job... without knowing some of the tricks... Gaps developed... I THOUGHT I researched the heck out of how to properly install.... I did those angled cuts (forgot the name)...I used 20 minute mud over top because she was SOOO picky...
The "tricks" are established procedures used by professional Carpenters.

Is the "She" the wife?

Sounds an awful lot like a DIY/HD/Blows job where their "pro advice" wasn't quite up to snuff.

Just another perspective.
 
On my installs, this is how I make my scarf joints....I experimented with a few different ideas on the last addition I trimmed out.

Best results came from (IMO)

Coped inside corners and 45 degree scarf joints. I start by putting up the long runs that require scarf joints first...this allows me to glue the snot out of the scarf joint and make sure the scarf joint is TIGHT. This is key. Wood glue does NOT like to span gaps, the tighter you make that joint, the stronger the glue bond will be. By doing these runs first, you don't have to worry about fitting a scarf joint AND a corner joint...which makes this a bit more complicated. Once that joint is made, and the glue is dry (30min to 1 hour depending on glue), I go back and sand the joint with 100 grit. Following the sanding I "float" a thin coat of MH Ready Patch over said joint, I just use my fingers for this...I got pretty good at laying down a nice, thin uniform coat after a few joints. Let that dry and sand that with 180 grit. Spray prime with Kilz oil and sand with 220.

Every joint I made like that was 100% impossible to find...time consuming to make, but I can't even pin-point them after paint and I know where I put them.

NONE, and I mean NONE of my field(scarf) joints opened up once the heat came on and the AGA stove was installed(massive cast iron stove that runs 100% of the time and puts off crazy amounts of heat).

I installed during the humid NJ Summer and the last time I walked around the place was Mid December.

I think your 20 min mud works in the same capacity that I use MH Ready Patch, BUT, your joint cannot be subject to opening, or the MH/Hot Mud will just crack.
 
The key is a tight Glued joint. I use 45 degree b/c it gives more surface area for the glue to work with then a butt joint, 22.5 or 30 degree. Also gives more "face" or "edge" grain, which glues up better then "end" grain. I have even thought about trying 60 degree scarf joints....just never have.

With that, I am out to celebrate NEW YEARS!
 
Are they using a wood stove in the room or close by? That will do it every time.
amen to that, my coffered ceiling I started last spring opened up like the grand canyon once I hooked up the pellet stove. Been running the humidifier 24/7 full blast for a week now. good thing its paint grade and not finished yet. :no: what is striking is that this only happened with the fjp 1x6's and not the poplar. I chalked it up to the storage conditions at the different yards. The fjp was bought in the summer, stored outside at the yard and installed in the summer. The poplar was stored indoors and installed in the fall. the battle with moisture control is an epic one indeed.
 
1 - 20 of 94 Posts